How Do I… Transfer mpi32?
|
|
How Do I… Transfer mpi32?
|
|
This depends on
which version of mpi32 you are running. If you are on version 2.2.6 or
above, then it is quite simple. But if you are on anything below version
2.2.6 then it gets a little more complicated. Note: if you are on version
1.x of mpi32 then the ONLY way to transfer mpi32 is to upgrade to the
latest version of mpi32 due to the fact that version 1 of mpi32 was
registered to your PC’s hardware and requires re-registration to a new PC
to function – which is no longer possible. |
|
|
So, how do you tell
which version mpi32 you are running?
Just look at the “Title Bar” in mpi 32 (not Call Reporter). |
|
|
|
|
|
If you are on
anything below v2.2.6, contact the
MPI Support
Team for an upgrade and then follow the instructions below. If you
are not on support, then
there may be a charge to upgrade. Note: all customers on version 1.x are
not on support. |
|
|
Transferring mpi32 |
|
|
1. Close mpi32. |
|
|
2. Copy the folder
C:\mpi32 in it’s entirety to the new PC. You can do this in a number of
ways; across a network, directly from the old Hard Drive to the new one or
via CD backup1. |
|
|
3. Download and run
the free “MPI
Transfer” utility (mpixfer.exe) on the new PC to create the shortcut
in the Startup Menu (this utility places a shortcut in your “Startup” menu
that allows mpi32 to start automatically when you reset your PC). |
|
|
4. Relocate the
PABX Cable from the Com Port of your old PC into the Com Port of your new
PC. You can normally tell which one is the PABX Cable as it will be
leading away from the PC (i.e. it won’t be connected to a keyboard, mouse,
monitor or power point). Try to place the cable in the matching Com Port
on the new PC, so, if it was in Com 1 on the old PC, plug it into Com 1 on
the new PC and you won’t need to change the settings2
in mpi32. |
|
|
Notes: |
|
|
1. If you do
transfer mpi32 via CD, be careful when you restore it on to the new PC
that the files are not “Read Only”, as this will cause you problems. To
avoid this, use a program such as “Winzip” to compress the mpi32 folder to
a single “zip” file before writing it to CD (an evaluation version is
available from
www.winzip.com with instructions on its operation). This will
preserve the files with the correct attributes – i.e. NOT “Read Only”. |
|
|
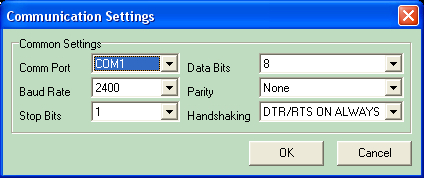
2. If it is not
possible to put the PABX cable in the Same Com Port on the new PC, change
the Com Port Settings by starting mpi32 on the New PC and choosing
“Config” and “Communications”. If requested, the password is “unlockme”.
Select the correct Com Port
from the drop down menu and click [ OK ]. |
|
|
|
|
|
Do NOT change any
other settings at this time as they won’t have changed in the transfer. |
|
|
That’s all. There
are no “dlls” or “Registry Entries” required by mpi32 – it is all
contained in the mpi32 folder, making it very easy to transfer. |
|
|
Home Call Reporter Contact Us Customer Update Support Newsletter FAQ Products Purchase Demo End User Licence Agreement |
|